Puff Embellished Tote: A pattern to jazz up your simple market tote
The Puff embellished tote is the second lacy market tote pattern in the Granny Square base crochet market tote series. It is made with a rounded edge granny square as the base, that has puff stitches going on near the corners. Because of the rounded edges, the chevron effect in this tote is not as visible and effective as the Keep it Simple tote.
Like the Keep it simple tote, the previous pattern in the series, the handles of this tote are also made seamless from the body. Therefore, there is no weaving in the ends other than the beginning and the finishing tails.
Pattern level
Intermediate
The pattern is written in US terminology
Materials
Yarn: 350 m of sport weight yarn
Crochet hook: 3mm or any size to obtain the gauge
Yarn Needle
Scissors
Stitch markers: 8
Abbreviations
ch – chain
cdc – chainless double crochet (can be substituted with ch3)
dc – double crochet
fsc – foundation single crochet
prev – previous
R – round
sc – single crochet
slst – slip stitch
sk – skip
sp – space
st(s) – stitch(es)
tr – treble crochet
Special Stitches
- dc2tog – two double crochet placed together
*yarn over, insert hook into the next ch3, yarn over, pull up a loop, yarn over, pull through two loops* two loops on the hook, sk 3sts, repeat **, three loops on hook, yarn over and pull through all three loops.
- puff st – puff stitch
*yarn over, inserst hook into the st, yarn over pull up a loop* 5 times, 11 loops on hook, yarn over pull through 10 loops, two loops on hook, yarn over, pull through two loops.
Gauge
The base measures 4” after round 6
Finished dimension
Base: 10” square
Height: 15” from tip centre of the base to the point where handles are attached when laid flat (excluding the handles)
You can get the print-friendly version of the pattern HERE
Note
- The tote is worked in rounds. So, there is no turning after every round
- Dc on ch3 means, dc in the 2nd ch of the ch3-sp.
- Do remember to skip three stitches between the legs of the dc2tog.
- Slst to the next st after the join to begin the next round
Instruction
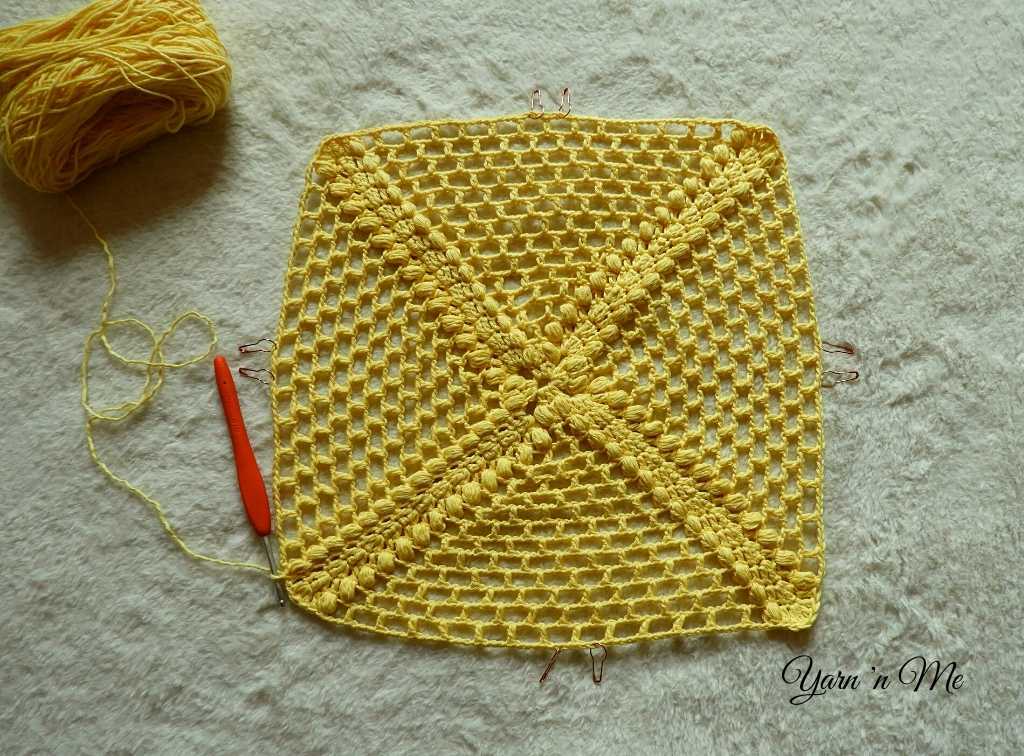
Base
Magic ring
R1: ch7, *3dc, ch4* thrice, 2dc. Join with slst to 3rd ch
R2: (cdc,dc,tr,2dc) in the ch4-sp, *puff st, dc, puff st, (2dc,tr,2dc) in ch4-sp* thrice, puff st, dc, puff st. Join with slst to cdc.
R3: cdc, (dc,tr,dc) on tr, dc on next dc, *puff st on next dc, ch3, sk puff st from prev row, dc on next dc, ch3, sk puff st from prev row, puff st on next dc, dc on next dc, (dc,tr,dc) on tr, dc on next dc* thrice, puff st on next dc, ch3, sk puff st from prev row, dc on next dc, ch3, sk puff st from prev row, puff st on cdc of prev row. Join with slst to cdc
R4: cdc, (dc,tr,dc) on tr, dc on next dc, *puff st on the next dc, (ch3, dc on next ch3) until the ch3 before the puff st, ch3, puff st on next dc, dc on next dc, (dc, tr, dc) on tr, dc on next dc* thrice, puff st on the next dc, (ch3, dc on next ch3) until the ch3 before the puff st, ch3, puff st on cdc. Join with slst to cdc.
R5-R15: Repeat R4
You can increase or decrease the number of repeats for the larger or smaller base of the tote. Do finish with odd number of rows at the base
Lay your square flat.
Place stitch marker on the 7th and 8th ch3 on each side (You will have to place marker on the 2nd ch of the ch3)
If you have altered your base, find the two ch3 in the middle of each side separated by 1dc and place markers
Body
R1: cdc, (dc,tr,dc) on tr, dc on next dc, *puff st on the next dc, (ch3, dc on next ch3) until the ch3 before the stitch marker, ch3, dc2tog, (ch3, dc on next ch3) until the ch3 before the puff st, puff st on next dc, dc on next dc, (dc, tr, dc) on tr, dc on next dc* thrice, puff st on the next dc, (ch3, dc on next ch3) until the ch3 before the stitch marker, ch3, dc2tog, (ch3, dc on next ch3) until the ch3 before the puff st, puff st on cdc. Join with slst to cdc.
Place marker on ch3 before and after dc2tog
Note: You are skipping the 3rd ch of the first ch3, 1dc and 1st ch of the next ch3 in between the legs of dc2tog
R2-R15: Repeat R1
You can increase or decrease the number of repeats for taller or shorter tote
Note: From R2, the two legs of the dc2tog fall respectively on the marked stitches. You will be skipping the 3rd ch of the first ch3, dc2tog and 1st ch of the next ch3 in between the legs of dc2tog
R16: cdc, (dc,tr) on tr, *ch1, fsc71, (tr,dc) on next tr, dc on next dc, puff st, (ch3, dc on next ch3) until the ch3 before the marker, ch3, dc2tog, (ch3, dc on next ch3) till the before the puff st, puff st on next dc,* dc on dc, (dc,tr) on tr, repeat **. Join with slst to cdc
Note: ch1 does not count as a stitch but acts as an anchor to your first fsc. You can increase or decrease the number of fsc for longer or shorter handles. Keep the number of fsc in multiples of 2+1
Place marker on ch3 before and after dc2tog
R17: cdc, (dc,tr) on tr, *(dc on next fsc, puff st on next fsc) until the end, dc on last fsc, (tr,dc) on next tr, dc on next dc, puff st, (ch3, dc on next ch3) until the ch3 before the marker, ch3, dc2tog, (ch3, dc on next ch3) till the before the puff st, puff st on next dc,* dc on dc, (dc,tr) on tr, repeat **. Join with slst to cdc
R23: ch1 (does not count as stitch), sc in each st around, slst to the first slst.
Fasten off and weave in the ends
And now, your tote is ready to take out for shopping.
Thanks a ton for your invaluable support. I hope that you enjoyed making this pattern.
If you share your project on Instagram, please tag me, and post it with the hashtags #yarnnmedesigns and #ecofriendlycrochetfor2021. I love to see your creation.
Join my Facebook group Yarn ‘n Me makers for more fun content and interaction.
Visit My Ravelry Store to get the print-friendly versions of all my patterns